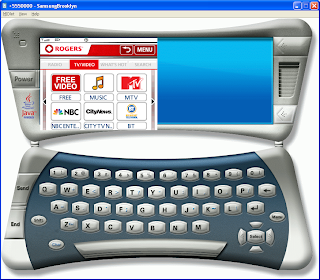
Why do we need to customize J2ME emulator ?
As a J2ME mobile developer, you have to port application to different devices, while the J2ME default emulator only provide 4 different profiles, which can not meet our needs, and also some platforms like BlackBerry, Nokia S60 etc, the J2ME emulator they provided are really slow to launch, which is really inconvenient. If you can customize the emulator to support the device you are porting, which will improve your developing productivity.
Here I will give you’re my examples: BlackBerry 9000(Bold), LG XENON, Nokia 5800, Samsung Brooklyn. Please check the following table for their specs:
Device Name
| Key pad
| Screen Size
| Touch Screen?
|
Black Berry 9000
| QWERTY
| 480x320
| NO
|
LG XENON
| QWERTY
| 400x240
| YES
|
Nokia 5800
| QWERTY
| 640x320
| YES
|
Samsung Brooklyn
| QWERTY
| 320x240
| YES
|
I will show you how I customize the above 4 devices.
Where are the emulator device profiles located?
For example, if you installed wireless toolkit 2.5 in c:\WTK25, then the device folder is:
C:\WTK25\wtklib\devices
The mobility package is included in the NetBeans 6.5 or later version, the wireless toolkit folder is like this:
C:\Program Files\NetBeans 6.x\mobility8\Java_ME_platform_SDK_x.x
Create a new emulator device profile
I like to choose Sun Wireless Toolkit 2.5, because its Qwerty Device emulator looks better. For example, if I want to create a device for Black Berry 9000:
1. Copy the entire folder of “QwertyDevice” to a new folder, rename the new folder name to “BlackBerry9000”
2. Go inside the folder, rename the Qwerty.properies file to BlackBerry9000.properties
Enable the touch screen
The touch screen feature is disabled for J2ME default emulators. If you want to enable it, you need to modify the .properties file. In properties file, find following statement:
touch_screen=false
Change false to true will enable the touch screen.
Change the screen size
For example, for BlackBerry 9000, its screen size is 480x320, then go to .prperties file, update the following values:
screenPaintableRegion.width=480
screenPaintableRegion.height=320
and ..
screen.width=480
screen.height=332
Please note that you need to make sure:
screen.height > screenPaintableRegion.height + screenPaintableRegion.y
In the properties file, screenPaintableRegion.y=11, so the screen.height value is 332.
If you don’t put the correct value, the emulator will throw exception once it is launched.
Make your customization available in NetBeans IDE
Once You finished the customization, you need to update your NetBeans IDE environment:
- Select Tools – Java Platform, choose Sun wireless toolkit 2.5, click Refresh button
- You will see the device names you added in the device folder
Here are the examples:
BlackBerry9000: 480x320
LGXENON: 400x240

Nokia 5800: 640x360
Samsung Brooklyn: 320x240
You can easily customize J2ME emulator by modifying the .properties file, even it is really simple, it can improve your productivity considerably.
Further steps
This article is only focused on Wireless Toolkit 2.5.x , Sun released the new wireless toolkit 3.0, the device emulators are changed a lot. I need to do more investigation on 3.0 emulator in future..


